 |  |  |
|---|---|---|
 |  |  |
 |
Click on a picture in the gallery above to see a full resolution image, or to navigate manually
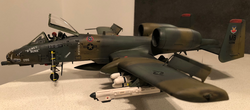
Fairchild-Republic A-10 Thunderboldt II ("Warthog")
Why this plane?
The A-10 is one of my favourite planes of all time. Objectively it should be described as something between ugly and weird - the nickname "warthog" comes from somewhere. But every bit of it was well thought out in terms of fitting a function, and as such it became loved by both aircrews and the people on the ground it supports. If you are in a tight spot, there is something quite appealing about a plane that can soar above you while firing 30 cm long rounds, 70 times per second, at anyone who is bothering you. And, of course, the sound effect is iconic.
What was added
The kit was completed out of the box except for the decals. The original ones were all yellowed and breaking up, so I ended up ordering a new set online (Print Scale Decals 1/48 A-10 Thunderbolt II Decals Part 1). This was before I discovered the magic of Microscale micro-liquid decal film.
This model does not correspond to a real A-10. It is based on 79-0096 ("Honey Buns"/ "Wicked Sensation"), but I decided that it needed the hog mouth, which required some movement of markings and stencils.
Notes and lessons learned
For my first model I decided to get an old kit that had been sitting in a cupboard for about 20 years. I bought it at a toy fair I attended with my son Arthur when he was 8 years old, but we never really had a chance to build together.
I thought it would be better to start with something "not too complex". Little did I know. To make a long story short: the kit itself was poor by current standards (bad fit, raised panel lines, unclear instructions). Combine this with an inexperienced builder trying to apply a 3-tone camouflage pattern while learning how to airbrush...well, I think I am lucky that I completed it at all!
This being a first attempt, I made a lot of rookie mistakes. To save yourself some of my troubles, when building this kit keep in mind the following:
-
Add weight to the nose, even if the instructions don't tell you to do it. This "hog" stands straight only due to a little transparent stick which is propping the tail section (provided in the kit).
-
Test the fit of the cockpit to both sides of the fuselage before you cement. I foolishly glued it to one side thinking that it would, of course, be centred. Bad mistake. I had a gap of >1 mm on the left side, which introduced me to the art of applying Tamiya putty. The result is not ideal, but passable from a distance...
-
The wheel wells fit more or less OK under either of the wings, but in reality there is only one correct placement. This only became obvious to me after I tried to attach the undercarriage. Suddenly it was clear that those wheels could never go inside. This costed me a lot of cutting, sanding, and re-painting.
-
Tamiya putty dries very quickly, but a cotton tip dabbed with acetone gives you a little extra time to smooth things out.
P.S: the photos in the gallery above are all of the same model. Just shows you how different cameras and conditions of illumination may change the colours you perceive. To my eyes the best representation of the "true" colours is in the top and left side views.